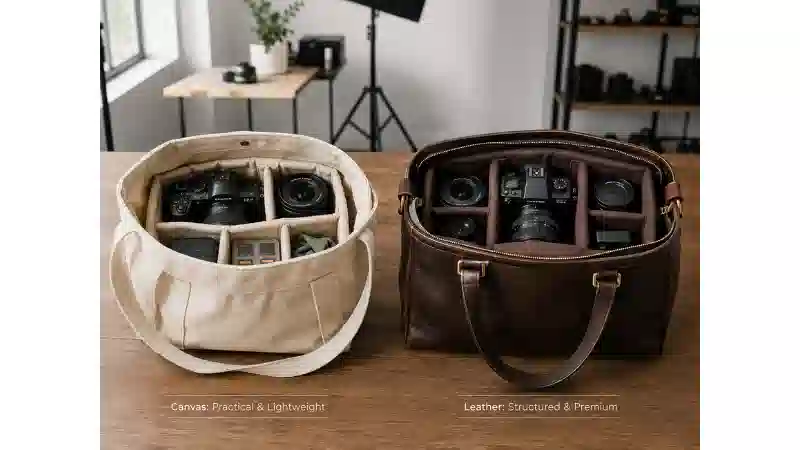
A camera tote bag has to do more than hold a camera. A mirrorless body needs controlled padding, lenses should remain separated, batteries and memory cards need dedicated storage, and the opening must still allow the photographer to reach the camera without forcing it past a zipper or handle.
For compact mirrorless kits, street photography, workshops, and everyday shooting, a well-constructed canvas camera tote is usually the more practical starting point. Canvas can keep the empty bag relatively light while supporting a removable padded insert, adjustable dividers, a stable base, and visible custom artwork.
A leather camera tote can work well when the kit is smaller and carefully controlled and structured presentation matters. It can suit urban photography, client meetings, premium gifts, or projects where restrained branding is preferred.
Neither exterior material protects camera equipment by itself. Thick canvas without padding is still a soft bag, and leather without correctly fitted internal protection can still allow a camera body and lens to contact one another.
The safest buying logic is therefore simple: define the camera kit first, design the protective interior around that kit, and choose Canvas or Leather after the functional requirements are clear.
This guide provides a product-selection and sample-review framework. It does not establish a universal impact rating, waterproof rating, load capacity, or long-term protective performance for any camera tote construction.

Quick Comparison: Canvas or Leather for a Camera Tote?
| Decision Factor | Canvas Camera Tote | Leather Camera Tote |
|---|---|---|
| Typical empty weight | Often lower when dimensions, lining, hardware, and reinforcement are comparable | Can be higher when substantial leather, lining, panels, and metal hardware are used |
| Camera insert | Works well with removable or fixed padded inserts | Works well when the insert is accurately matched to the structured interior |
| Organization | Flexible for sewn pockets, removable pouches, and adjustable dividers | Complex permanent organization may add weight and material use |
| Shape | Ranges from soft to structured depending on fabric, lining, insert, and base | Often more structured, depending on leather type and construction |
| Weather exposure | Untreated canvas can absorb moisture; treated constructions vary | Moisture response depends on leather composition and surface finish |
| Customization | Printing, embroidery, patches, and woven labels | Embossing, debossing, initials, and restrained branding |
| Best starting point | Everyday mirrorless kits, workshops, street use, and creator programs | Compact premium kits, meetings, urban use, and gifts |
For most compact mirrorless kits, Canvas is the practical default. Leather becomes more attractive when the equipment load is controlled and appearance justifies the additional material-specific care.
Build the Camera Tote Around the Actual Gear
Do not choose the bag by exterior dimensions alone. Begin by assembling the equipment normally carried on a shooting day.
A representative compact kit might include a mirrorless camera body with a mounted lens, one additional lens, spare batteries, memory cards, filters, a charger or cable, a blower, a cleaning cloth, and a small personal item such as a phone or notebook.
This example is not a fixed capacity standard. A photographer carrying two bodies, several large zoom lenses, lighting equipment, a drone, or a full-size laptop may already be outside the practical range of a tote.
Measure the Camera With the Lens Mounted
A camera that fits without a lens may no longer fit once the normal shooting configuration is installed. Measure the complete body with the lens that usually remains mounted, including any grip, cage, protective shell, or other accessory that changes its external dimensions.
The camera should enter without pressing the viewfinder, rear display, control dials, lens barrel, or accessory against a hard divider or the bag opening.
Give Every Additional Lens Its Own Protected Position
An extra lens should not roll freely beside the camera body. It needs a padded position that prevents direct contact with another lens, batteries, chargers, metal hardware, or the base.
The divider should support the lens without creating excessive pressure on focus or zoom rings. Extremely large or heavy lenses may require a backpack, hard case, or another purpose-built carrier instead of a tote.
Separate Batteries, Memory Cards, and Filters
Small accessories need a different storage system from the camera compartment. Memory cards should remain in a clean card case or controlled pocket, while filter cases should be stored where heavy equipment cannot press directly against them.
Spare batteries also need protection from loose metal objects. The U.S. Federal Aviation Administration states that spare lithium batteries carried by passengers must be protected from damage and short circuit, and their terminals should not contact other metal. Battery cases, sleeves, original packaging, or separate protective pouches are examples of suitable separation. For air travel, current requirements should be checked through the FAA PackSafe lithium battery guidance.
A dedicated accessory pouch is therefore more useful than allowing batteries, cards, keys, and cables to collect underneath the padded insert.

Padding and Divider Fit Matter More Than Exterior Material
A camera tote should not be described as protective simply because the exterior fabric feels thick. The protective system begins inside the bag.
Fixed Padding or Removable Camera Insert?
Fixed padding creates a purpose-built interior and can work well when the intended camera kit rarely changes. The disadvantage is reduced flexibility when the photographer changes bodies, lenses, or uses the tote for another purpose.
A removable padded insert provides greater flexibility. It can be removed for cleaning, replaced when worn, reconfigured for another kit, or taken out when the outer tote is used without camera equipment.
The insert still needs to match the outer bag. An insert that is too small can slide or tip. An oversized insert can distort the tote, reduce the usable opening, and create pressure against the zipper or sidewalls.
How to Check Adjustable Divider Fit
Adjustable dividers should hold the equipment in controlled positions without squeezing it. During sample review, check:
- Divider height: the divider should provide meaningful separation without interfering with the closure.
- Bottom gaps: narrow objects should not slip underneath a divider during normal handling.
- Side pressure: the camera body and lens should not be compressed against hard controls, rings, or screens.
- Divider movement: the divider should remain in position when the tote is carried and set down.
- Lens clearance: lenses should not contact each other above the divider when the bag tilts.
- Access: the photographer should be able to remove the body without first dismantling the entire layout.
A divider layout that looks neat in an empty sample can fail after the real gear is installed. Evaluate it loaded.
Choose the Canvas Specification, Not Just the Word "Canvas"
Canvas describes a fabric construction rather than one fixed performance level. Fiber content, weave, fabric weight, finish, lining, stitching, handle construction, and reinforcement all affect the finished camera tote.
The guide to canvas fabric types, weights, and uses explains the main variables. Buyers should also understand that Cotton identifies a fiber while Canvas describes a construction, as explained in the comparison of cotton and canvas tote bags.
When comparing swatches, the differences between cotton canvas and cotton twill can provide additional context about weave and surface character.
Request the Exact Leather Specification
Full-grain, top-grain, split, bonded, coated, and imitation leather products do not have identical weight, surface behavior, moisture response, or repair potential.
The FTC Leather Guides address representations about the composition and characteristics of leather and imitation-leather products. Camera-tote buyers should request the actual material composition rather than relying only on a broad description such as "leather."
Also confirm backing, lining, edge treatment, hardware, finished empty-bag weight, cleaning instructions, and which components can realistically be repaired or replaced.

Choose the Tote Around the Photography Task
| Photography Use | Typical Priority | Useful Bag Direction |
|---|---|---|
| Compact mirrorless kit | Low empty weight, body plus one spare lens, fast access | Small padded tote with removable insert |
| Street photography | Quick camera access and controlled movement | Compact tote with secure opening and close-to-body carry |
| Travel-light photography | Gear protection without excessive bulk | Tote or messenger for a genuinely small kit |
| Portrait or event work | Additional lens, flash, batteries, and accessories | Larger organized carrier; consider a backpack when the kit grows |
| Photography workshop | Repeatable layout and easy sample approval | Custom tote with standardized insert and accessory storage |
A camera tote is most convincing when the kit remains compact. Once additional bodies, long lenses, flashes, audio equipment, or heavy personal items are added, the question may change from "Canvas or Leather?" to "Is a tote still the correct format?"
Closure, Weather Protection, and Base Stability
Check the Closure With the Camera Insert Loaded
A full zipper improves containment while commuting or moving through public spaces, but it must be tested with the complete padded insert installed. Padding can reduce the effective top opening even when the bag's external width appears generous.
A flap or snap can provide faster access, but the opening is not enclosed in the same way as a full zipper. The correct choice depends on access, security, weather exposure, and the intended shooting environment.
Do Not Confuse Fabric Water Repellency With a Waterproof Camera Bag
Untreated canvas can absorb water, while coatings or finishes can improve surface resistance. However, seams, stitching holes, zipper tape, pockets, openings, and the base still affect the complete tote.
AATCC TM22 is a textile test method that evaluates resistance of fabric to wetting by water. A fabric-level result therefore does not, by itself, establish that a finished camera tote is waterproof. Buyers who need documented water performance should define the claim and the finished-product test requirement rather than relying on the exterior material alone. The AATCC TM22 Water Repellency: Spray Test provides the relevant fabric-testing context.
For general natural-fiber maintenance, the guide to protecting a cotton bag from moisture and wear provides additional background.
Protect the Base Without Overbuilding It
The bottom of a camera tote repeatedly contacts floors, benches, vehicle interiors, and other surfaces. A padded or removable base panel can reduce direct contact, help the insert remain upright, and improve the loaded shape.
This should not be confused with a certified drop-protection system. A base insert that improves everyday handling does not establish a safe drop height unless the exact finished construction has been tested for that purpose.
Check Size, Opening, Handles, and Loaded Balance
External length and height do not reveal the entire usable capacity. Lining, padding, dividers, zippers, side seams, pockets, and base reinforcement all reduce internal space.
Before approving a camera tote, measure:
- the camera with the normal lens mounted;
- the largest additional lens;
- the complete padded insert;
- the accessory pouch;
- the usable top opening;
- the internal base width;
- the gusset depth;
- the handle drop;
- the optional shoulder or crossbody strap configuration.
The opening deserves particular attention. A camera may fit inside the main compartment but still be awkward to remove through a narrow zippered entrance.
Evaluate the Bag at Its Finished Empty Weight
Camera equipment is dense. The exterior shell, foam, lining, base panel, zippers, dividers, leather trim, and metal hardware all add weight before the first lens is installed.
Check handle width, edge finishing, attachment, shoulder clearance, optional long strap, and loaded balance. An exterior pocket filled with batteries and accessories on one side can make a shoulder tote twist even when the total load still fits.
Camera Tote vs Messenger, Sling, Backpack, or Hard Case
| Carrier Type | Best For | Main Limitation |
|---|---|---|
| Camera tote | Compact mirrorless kits, workshops, and urban use | Limited comfort and protection for large heavy kits |
| Messenger bag | Fast side access and moderate equipment | Load remains concentrated on one shoulder |
| Sling | Very compact kit and quick access | Limited internal capacity |
| Backpack | Larger kits and longer walking periods | Usually slower camera access |
| Hard case | Equipment requiring rigid external protection | Higher weight and less convenient everyday access |
A premium material cannot correct an unsuitable carrier format. When equipment becomes large, heavy, fragile, or difficult to balance, another bag type may be more appropriate than either a Canvas or Leather tote.
How to Review a Camera Tote Sample
Use representative equipment or safe non-damaging test items during a basic fit review. Do not intentionally drop valuable equipment to test a bag that has no documented impact rating.
- Build the intended kit: install the padded insert and arrange the body, lenses, accessory pouch, and personal items.
- Check divider fit: confirm separation, pressure, lens clearance, and movement.
- Test access: remove and return the camera several times while the bag is fully loaded.
- Carry the tote: check balance, shoulder pressure, swinging, handle alignment, and closure access.
- Inspect after carrying: check divider position, lining, base, seams, handles, closure, and equipment contact points.
| Inspection Area | Acceptable Observation | Reason to Revise or Reject |
|---|---|---|
| Camera fit | The body rests without pressure against controls or the screen | The body must be forced into the compartment |
| Lens separation | Each lens remains independently supported | Lenses contact each other during normal carrying |
| Divider fit | Dividers remain positioned without excessive compression | Dividers collapse, leave large gaps, or press against controls |
| Opening | The camera enters and leaves without forced angles | The body or lens repeatedly catches on the zipper or opening |
| Accessory storage | Batteries, cards, and hard accessories remain controlled | Loose items move into the camera or lens compartment |
| Base | The insert remains stable when the tote is set down | The insert repeatedly tips, slides, or twists |
| Handles | The loaded bag remains balanced for its intended use | The tote twists sharply or the attachment remains distorted |
| Closure | The closure operates with the full kit installed | The zipper or flap cannot close correctly |
| Artwork | Branding remains visually balanced when loaded | Insert or gusset expansion distorts the design excessively |
This sample review identifies fit and usability problems. It does not establish a formal impact rating, waterproof rating, or long-term protective performance.

Recommended Sample Approval Sequence for Custom Orders
- Approve the exterior material, lining, foam, and divider specification.
- Check an undecorated structural sample using the intended camera kit.
- Revise the insert, dividers, opening, base, handles, or closure where necessary.
- Approve artwork placement on the corrected construction.
- Review a decorated pre-production sample while it is loaded.
- Confirm production tolerances, packaging, quantity, and delivery requirements.
Cleaning, Repairability, and Long-Term Value
Do not assume every padded Canvas camera tote can be machine washed. Foam, lining, coatings, printed artwork, leather trim, zippers, hardware, and structured base components can require different care.
The article discussing whether canvas bags get dirty easily explains how finish, color, and use affect visible soil. For branded photography programs, the guide to keeping branded bags clean provides additional maintenance considerations.
Leather care should follow the exact material and finish. Whether handles, lining, zippers, straps, hardware, or the camera insert can be repaired or replaced should be confirmed before purchase.
Long-term value should also include the consequences of an unsuitable specification. The guide to hidden costs behind cheap bags explains why the lowest quotation can reflect differences in materials, reinforcement, and quality control.
Sustainability likewise cannot be determined from "Canvas" or "Leather" alone. Material sourcing, processing, durability, repairability, actual reuse, and disposal all matter. The comparison of sustainable bag materials provides a broader evaluation framework.
Custom Camera Tote Bags for Photography Programs
Custom camera totes can support photography-school welcome kits, camera-shop merchandise, photography workshops, creator events, photo clubs, photography retreats, brand collaborations, and premium customer gifts.
The guide to customizable reusable-bag giveaways provides additional planning ideas for event and community programs.
Define the Camera Kit Before Finalizing Artwork
Before requesting a quotation, confirm:
- target camera type;
- typical mounted lens;
- largest additional lens;
- insert dimensions and foam construction;
- divider layout;
- battery and memory-card storage;
- lining;
- closure;
- base construction;
- handle and shoulder-strap design;
- finished dimensions and usable opening;
- artwork size and location;
- quantity and packaging;
- sample stages;
- delivery requirements and production tolerances.
Select Decoration After the Functional Sample
Canvas commonly supports screen printing, transfer applications, embroidery, patches, and woven labels. Leather can suit embossing, debossing, initials, stamping, or restrained branding.
The overview of six tote bag printing methods can help buyers compare decoration processes before sampling.
Artwork should be approved on the corrected loaded construction. A logo centered on an empty flat tote can move once the padded insert and camera kit expand the bag.
Check Documentation, MOQ, and Production Planning
Material and environmental claims should be matched to appropriate documentation. The guide to environmental certifications for custom tote bags explains the types of documentation procurement teams may need to request.
The MOQ, lead-time, and cost guide can help buyers prepare a sourcing brief, while the explanation of how MOQ affects bulk bag production provides further context for comparing quotations.
PrintTotes provides information about its OEM bag services. Buyers with confirmed camera-kit requirements, dimensions, materials, artwork, quantity, packaging, and delivery requirements can submit them through the custom bag inquiry page.
FAQ
Q: Is Canvas or Leather better for a camera tote bag?
A: Canvas is generally the more practical starting point for compact everyday mirrorless kits because it can combine relatively low empty weight with a removable padded insert and flexible organization. Leather can suit smaller controlled kits where structured appearance and premium presentation are stronger priorities.
Q: Can a normal tote bag be used as a camera bag?
A: A normal tote does not become protective simply because the exterior is thick. Cameras and lenses need an appropriately fitted padded insert, divider system, or another purpose-built protective interior.
Q: Is a removable camera insert better than fixed padding?
A: A removable insert offers greater flexibility when equipment changes or when the outer tote also needs to serve another purpose. Fixed padding can work well when the camera kit is predictable and the bag is designed specifically around it.
Q: Should a camera tote have adjustable dividers?
A: Adjustable dividers are useful when the photographer changes camera bodies, lenses, or accessories. They should be checked for height, movement, gaps, pressure, and lens clearance with the intended kit installed.
Q: Does a camera tote need to be waterproof?
A: The required weather protection depends on where the equipment will be used. A water-repellent fabric does not automatically make the complete tote waterproof because seams, openings, zipper tape, pockets, and the base remain part of the finished construction.
Q: When is a backpack better than a camera tote?
A: A backpack becomes more appropriate when the kit is large, heavy, used for long walking periods, or requires more stable load distribution and additional equipment capacity than a shoulder tote can comfortably provide.
Conclusion
For most compact mirrorless kits, Canvas is the practical starting point because it works well with removable inserts, adjustable organization, relatively low empty weight, and visible customization.
Leather can be appropriate for a smaller controlled photography kit when structured presentation, tactile finish, or premium personalization matters more than minimum empty weight and simple maintenance.
The strongest buying decision does not begin with the exterior material. Measure the camera with its normal lens mounted, identify every additional lens and accessory, specify the insert and dividers, check the opening, base, closure, handles, and loaded balance, and then choose the Canvas or Leather construction that supports that system.